Table of Contents
- Can you have multiple Facebook Pages?
- How to log in to multiple Facebook accounts
- How to manage multiple Facebook Pages with Meta Business Suite
- How to manage multiple Facebook Pages with NapoleonCat
- Why choose NapoleonCat to manage your Facebook pages
- FAQs - Manage multiple Facebook accounts
- How can multiple people manage a Facebook page?
- How do I let someone else manage my Facebook page?
- How do I add a second manager to my Facebook page?
- How many people can have full control of a Facebook page?
- How to manage multiple Facebook accounts?
- How to manage multiple Facebook ad accounts?
- Can a Facebook page be managed by two accounts?
- What app can manage multiple Facebook pages?
- How do I access my multiple Facebook accounts?
Looking for a solution that takes the headache out of managing multiple Facebook Pages for clients? This article will show you how to do that in a way that’s efficient, effective, and secure.
So you never have to worry about posting under the wrong account, missing a comment from a customer, or losing access to a page altogether.
- Can you have multiple Facebook Pages?
- How to log in to multiple Facebook accounts
- How to manage multiple Facebook Pages with Meta Business Suite
- How to manage multiple Facebook Pages with NapoleonCat
- Why choose NapoleonCat to manage your Facebook pages
- FAQs – Manage multiple Facebook accounts
- How can multiple people manage a Facebook page?
- How do I let someone else manage my Facebook page?
- How do I add a second manager to my Facebook page?
- How many people can have full control of a Facebook page?
- How to manage multiple Facebook accounts?
- How to manage multiple Facebook ad accounts?
- Can a Facebook page be managed by two accounts?
- What app can manage multiple Facebook pages?
- How do I access my multiple Facebook accounts?

Manage multiple Facebook Pages from one place
Manage all your DMs, comments, and reviews from multiple pages in one place. Automate repetitive tasks, schedule posts, and get detailed analytics and reports – with an all-in-one social media tool.
Can you have multiple Facebook Pages?
Anyone who’s ever run a business with multiple services/products or worked for a marketing agency knows that yes, you can indeed manage multiple Facebook Pages.
Is it easy?
No.
I mean, no if you don’t have the right tools and just log into Facebook. And of course, I’m going to show you the right tools in this article. The kind of Facebook management tools for business that make managing multiple Facebook pages much easier than you’d think.
Note: this is not about how to manage multiple Facebook accounts, but business pages on Facebook – as they’re two different things. And how many Facebook pages can you have? There’s no definitive answer, and it seems like that number is unlimited.
How to log in to multiple Facebook accounts
Let’s remember that we’re talking about multiple Facebook business pages, not multiple Facebook personal profiles. You can only have one of those, but you can use it to manage multiple pages as an admin (or, what we used to call admin. More on that later.)
There is no way to log in to a Facebook page per se. You need to connect it to your Facebook personal account, and if you have multiple Facebook pages, you can then switch between those. When you click on your profile picture in the top-right corner, you’ll see a list of the Business pages you own or manage in any capacity.
When you click on “See all profiles”, you’ll see a full list, plus you can click through to a separate page with all your Facebook pages arranged in a list. From there, you can also create a new page.
When you create a Facebook page, you become its admin. But someone – for example, your client – can also add you to their Facebook page as a manager or contributor if they want you to have access to it to moderate comments, public content, or run ad campaigns. You can grant others access with full or partial control to a Facebook page.
There are a couple of things that might make this solution problematic:
- As a manager/contributor on multiple Facebook pages, you need to keep switching between them to keep track of the notifications. Plus it’s so easy to confuse pages and post as yourself/another page.
- Granting and revoking access to Facebook pages is problematic in itself – it’s not super secure, and you need to keep close track of who’s supposed to have access to your page at any given time plus to not get locked out of your own page (which happens, unfortunately.)
To avoid that, you can use external tools to manage your Facebook pages – for example NapoleonCat. But first, let’s look at what that looks like with the Meta Business Suite.
How to manage multiple Facebook Pages with Meta Business Suite
Meta Business Suite lets you manage your multiple Facebook pages, including posting content, monitoring analytics, and managing ad campaigns.
When you log in to Meta Business Suite, you’ll see all your Facebook pages, and so-called Business portfolios – or pages and accounts associated with each other around an advertising account. This includes your Instagram accounts, too, if you’ve connected them.
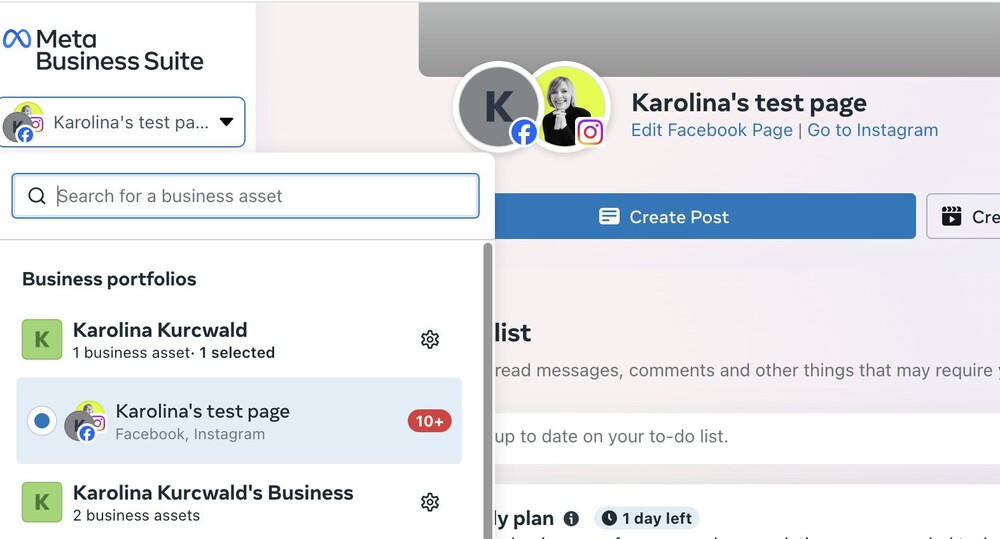
When you select a Facebook page, you can:
- check notifications
- plan and post content
- analyze results
- moderate comments and the Messenger inbox
- and manage your ad campaigns.
If you ask me, my main challenge with what happens in the Business Suite is the hierarchy of your assets (profiles, pages, Instagram accounts) and how they’re connected – as it’s not really what you can call intuitive.
Once you get the hang of it, though, you can manage multiple Facebook pages there. But you’ll still need to switch between the different pages to see comments, posts, analytics, and ads for a selected page. (Which is also how to manage multiple Facebook ad accounts.)
There is another way to do it, though – let me show you.
How to manage multiple Facebook Pages with NapoleonCat
With NapoleonCat, you can manage multiple Facebook pages in one dashboard, without even having to have access to them on Facebook. Here’s how it works:
Workspaces for access
NapoleonCat lets you connect any Facebook Business page to it, along with a bunch of other social media platforms.
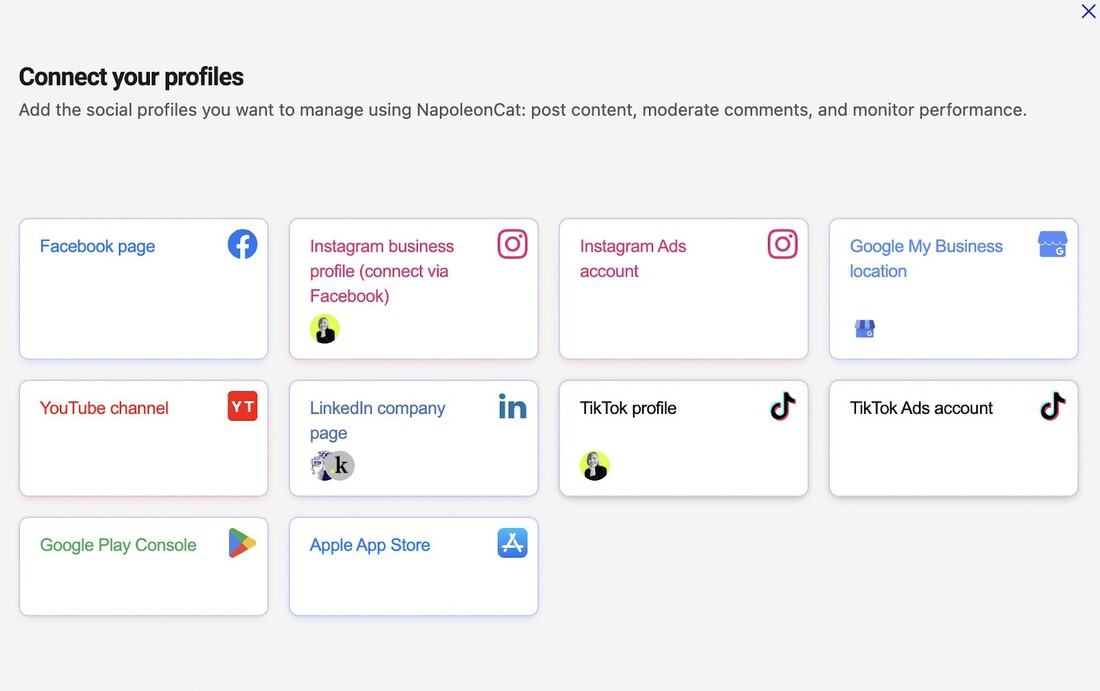
For that, you need to have access to the page and manage it. But anyone else that will work on it later – for example social media moderators or content creators – only needs access to your workspace in NapoleonCat.

In practice, this means that if you work for an agency with multiple clients:
- You can create separate workspaces for your different clients.
- Within every workspace, you can have a set of the client’s profiles and pages from different social media platforms.
- And an assigned team working on the account – moderators, content creators, social media managers, etc. None of them have to have physical access to the actual Facebook page, as they can do everything in NapoleonCat – reply to comments and messages, remove spam comments, plan and publish content (including Stories and Reels), analyze results, and even create automated reports for your clients.
Now, you can also connect Facebook pages you don’t manage – in this case, you’ll have access to that page’s analytics, making it a perfect tool for competitive benchmarking.
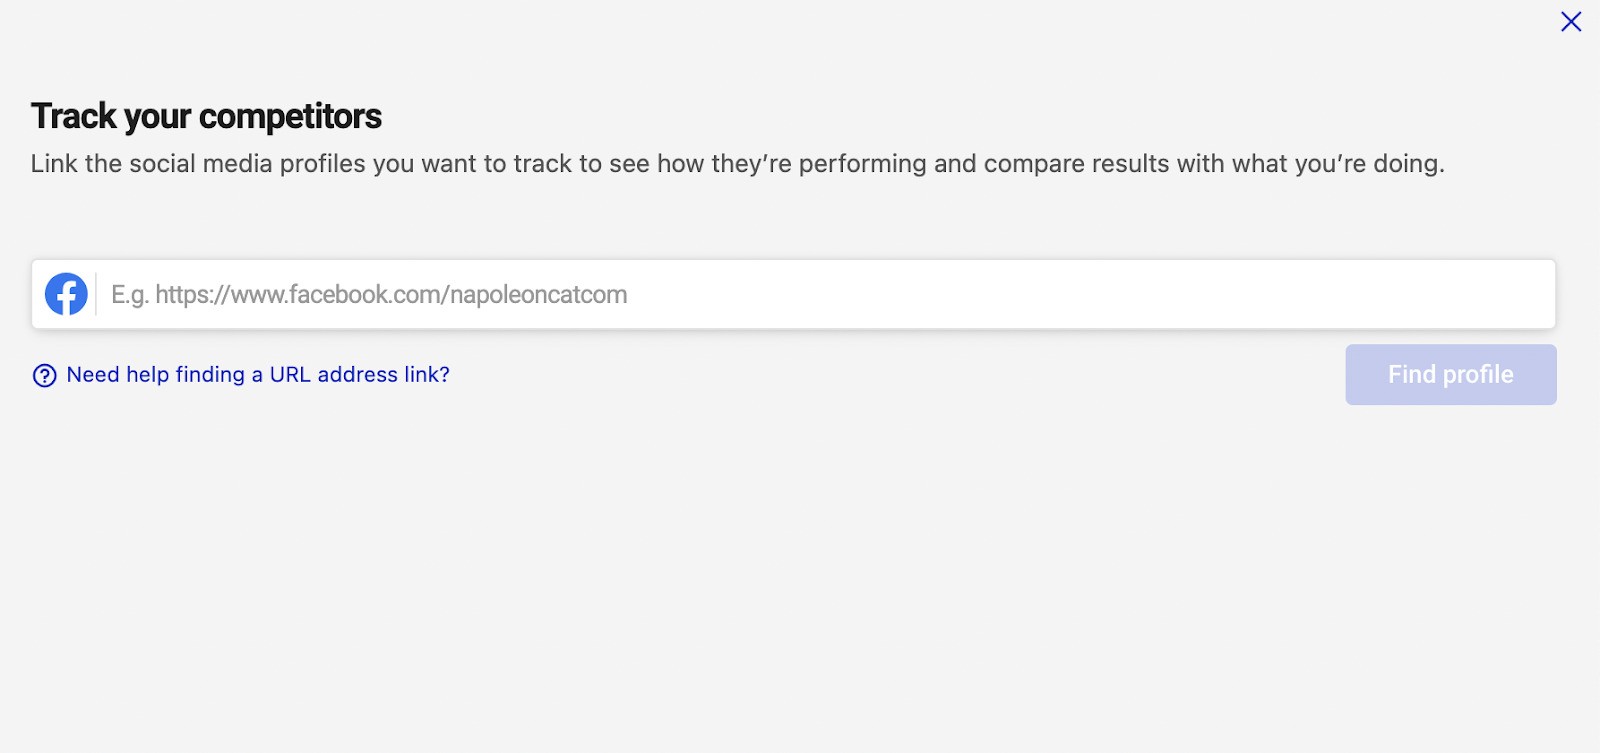
But for now, let’s look at all the things you can do in NapoleonCat for the multiple Facebook pages you manage.
Social Inbox for comment moderation
Within NapoleonCat’s Social Inbox, you’ll see all the comments, DMs, reviews, and page mentions for pages within the same workspace all in one place:
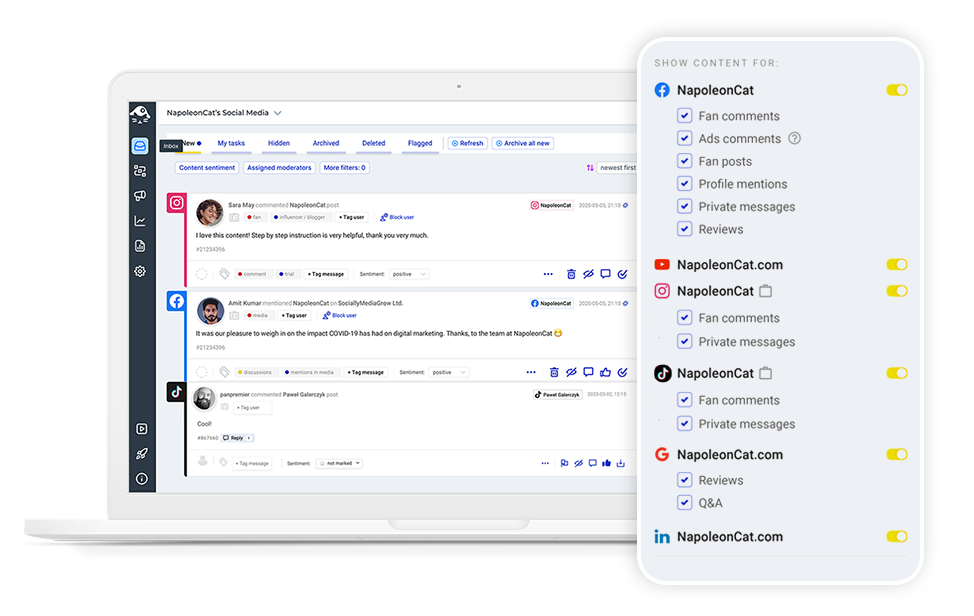
People with access to the workspace can:
- reply to the comments right from the Social Inbox
- like, hide or delete comments
- mark the sentiment of the comments
- assign comment threads as tickets to the moderation/customer service team members
- send them to consult with your client/other team members
- tag comments/authors – for example, as complaints, to know where to direct a comment and what kind of attention it needs.
Managing Facebook comments with NapoleonCat
To streamline social media management even more, we’ve introduced our own AI solution – The AI Assistant.
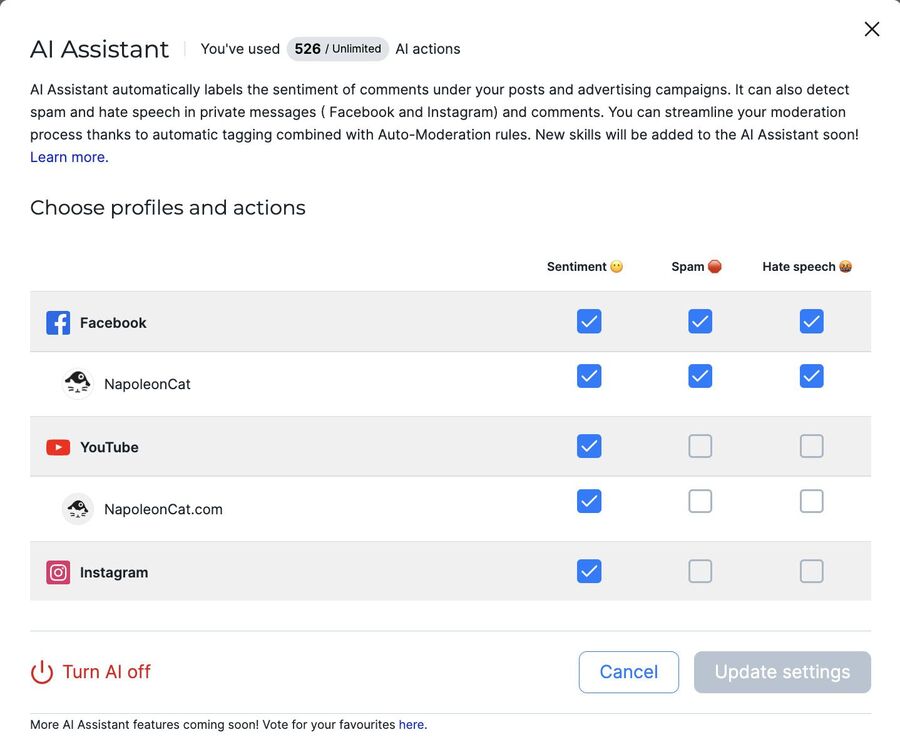
Once you activate it in the Social Inbox, it will automatically identify the sentiment of your comments – positive, neutral, or negative – as well as mark hate speech and spam comments with appropriate tags.
This way, all your Facebook interactions are quickly categorized, allowing you to prioritize them and respond to those that require immediate attention. In short, it means never skipping that one negative comment that led to a huge PR crisis 😇
Auto-moderation to automate some of the moderation tasks
NapoleonCat also offers Auto-moderation that helps you do some of that automatically, for example:
- Respond automatically to frequently asked comments with certain keywords in them
- Automatically assign comments to moderators based on sentiment or tag
- Automatically hide/delete spammy links or links to your competitors’ pages
- Automatically delete spam and offensive comments from your Facebook posts and ads
Our AI Assistant is fully integrated with the Auto-moderation feature too – which means that you can create rules that will automatically respond to comments based on their sentiment as well as the spam/hate speech tags (in the second case, you might want to select the automated action to hide/delete, since there’s no need to reply to spammers.
How will it help you manage multiple Facebook accounts?
For example, imagine you receive lots of comments — including simple thumbs-up comments like “Great product” or “I love your clothes.” Should you leave them unanswered? Absolutely not!
Social media users want to engage with brands and have conversations online — even if it’s just through short comment exchanges. But let’s be real – your moderators might not have the time to answer every single comment out there.
That’s why you can set up automated replies to let your customers know you appreciate their feedback. And to make the interaction feel more human, you can create multiple versions of replies that will be randomly selected and posted.
Auto-moderation is based on easy-to-complete rules, where you specify what triggers the rule and what action takes place automatically.
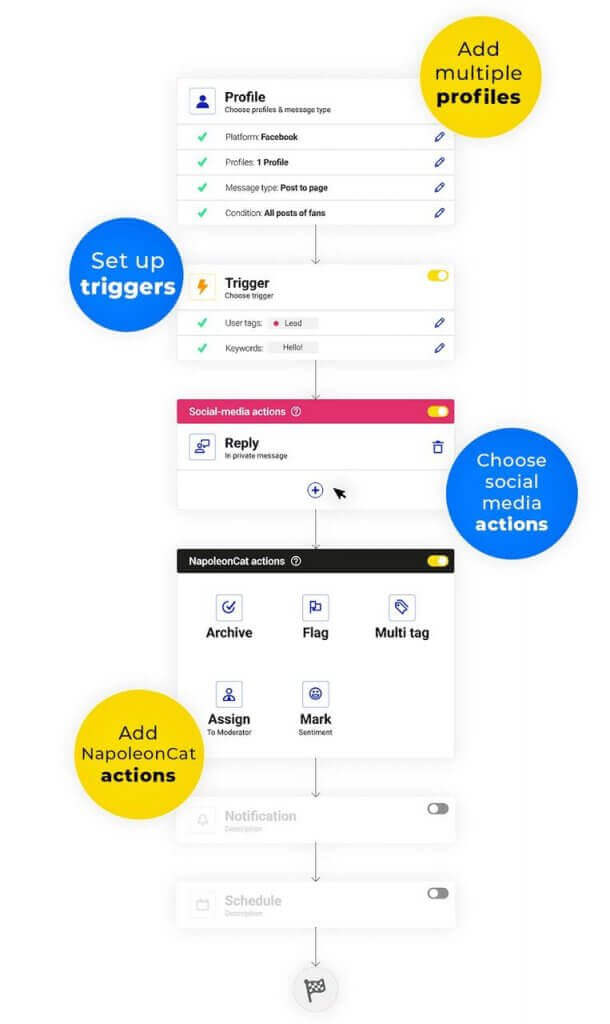
On Facebook, you can use Auto-moderation for both organic content and ads, leaving your moderators with more time and attention for more sophisticated discussions in the comment section.
You can create different rules for different Facebook profiles and even have separate rules for specific posts or just for ads – all running at the same time.

Protect your Facebook Pages from spam
Automatically hide or delete comments from Facebook spam bots under your organic posts and ads, for all your FB pages at once – with an all-in-one social media tool.
Publisher for planning and scheduling content
For the Facebook pages that you’re in charge of, you can also automatically publish content using NapoleonCat’s social media publisher.
Again, any team member who has access to a specific workspace and content publishing can add and schedule content, including Facebook posts, Stories, and Reels.
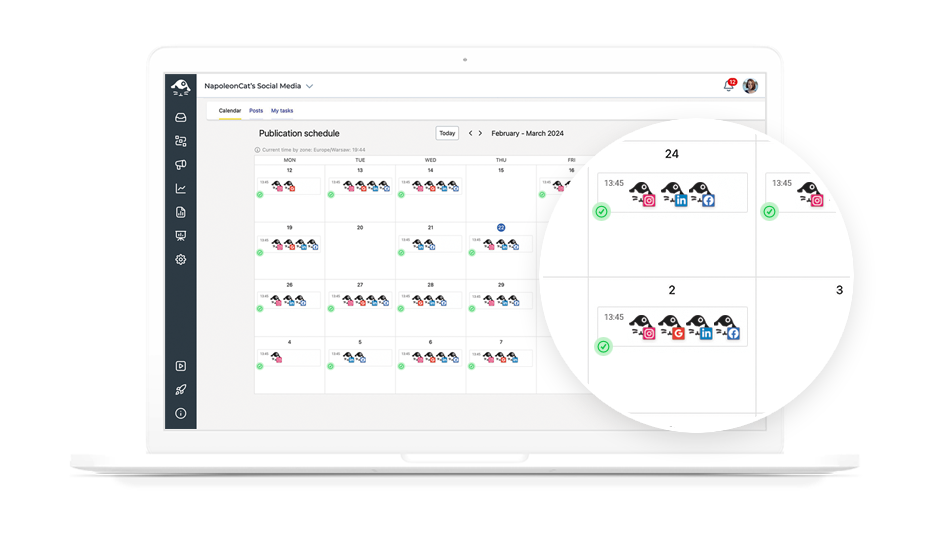
Using the Publisher, you can:
- schedule content to Facebook along other social media platforms, including Instagram and TikTok
- create drafts and work on them with external collaborators, designers, etc, exchanging comments and feedback within the tool
- assign content to others and send it for approval.
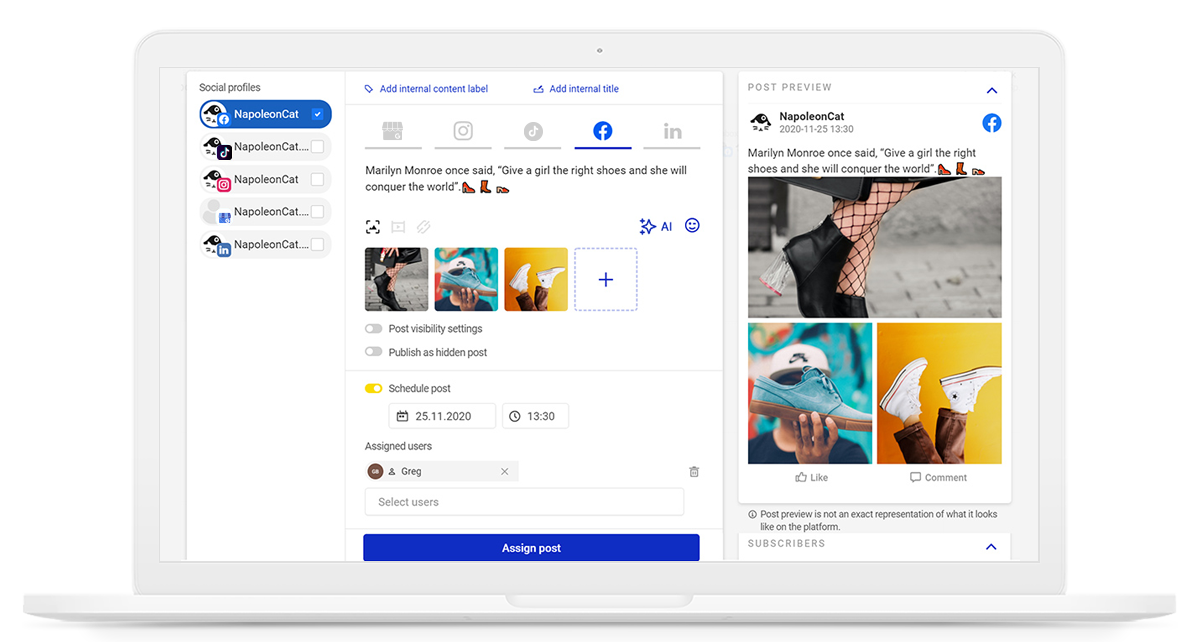
If you manage multiple Facebook accounts (or multiple social media accounts in general), this way to schedule content is basically indispensable.
Analytics to track results and measure impact
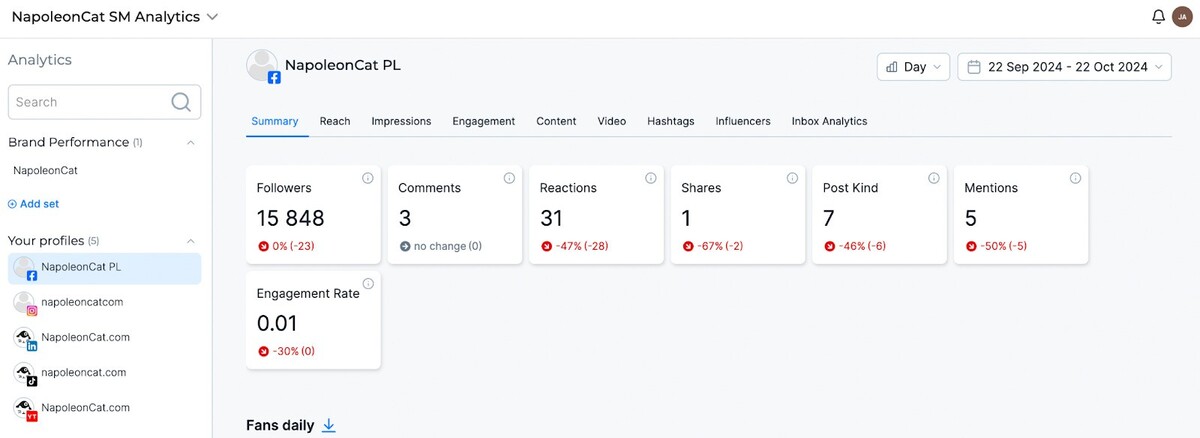
Another tool that NapoleonCat offers is social media analytics where you can follow and compare results for your Facebook pages (and other social media profiles) including engagement, reach, audience insights, and top-performing content.
You can also track analytics for Facebook pages you follow – for example, your competitors. So each workspace can have a set of your client’s pages and some reference pages to compare and benchmark results on Facebook.
Reports to share the results with your client and boss
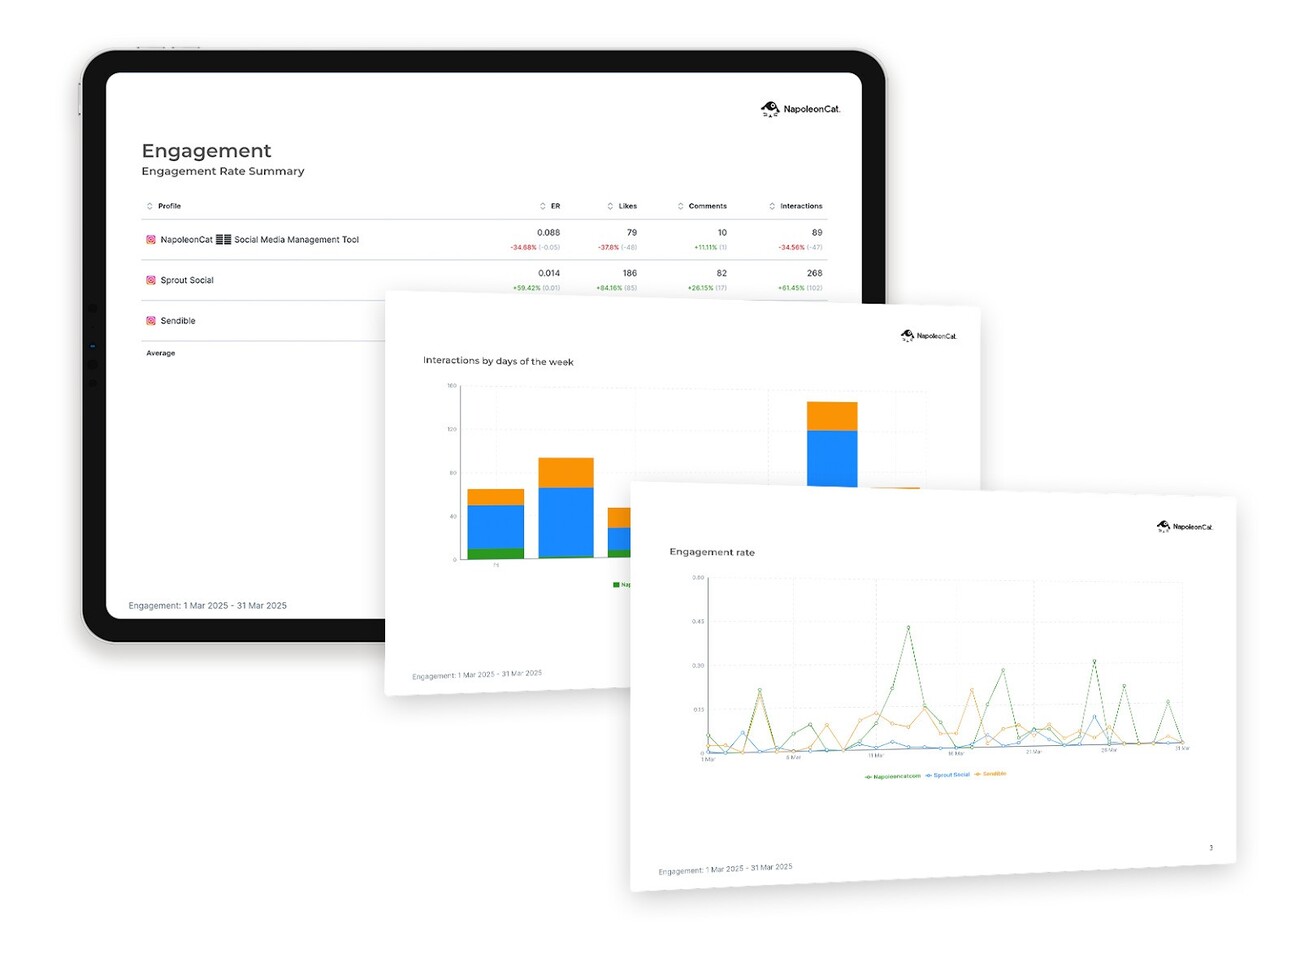
And one more thing you can do with your Facebook pages’ results is turn them into nicely designed PDF reports with just a couple of clicks.
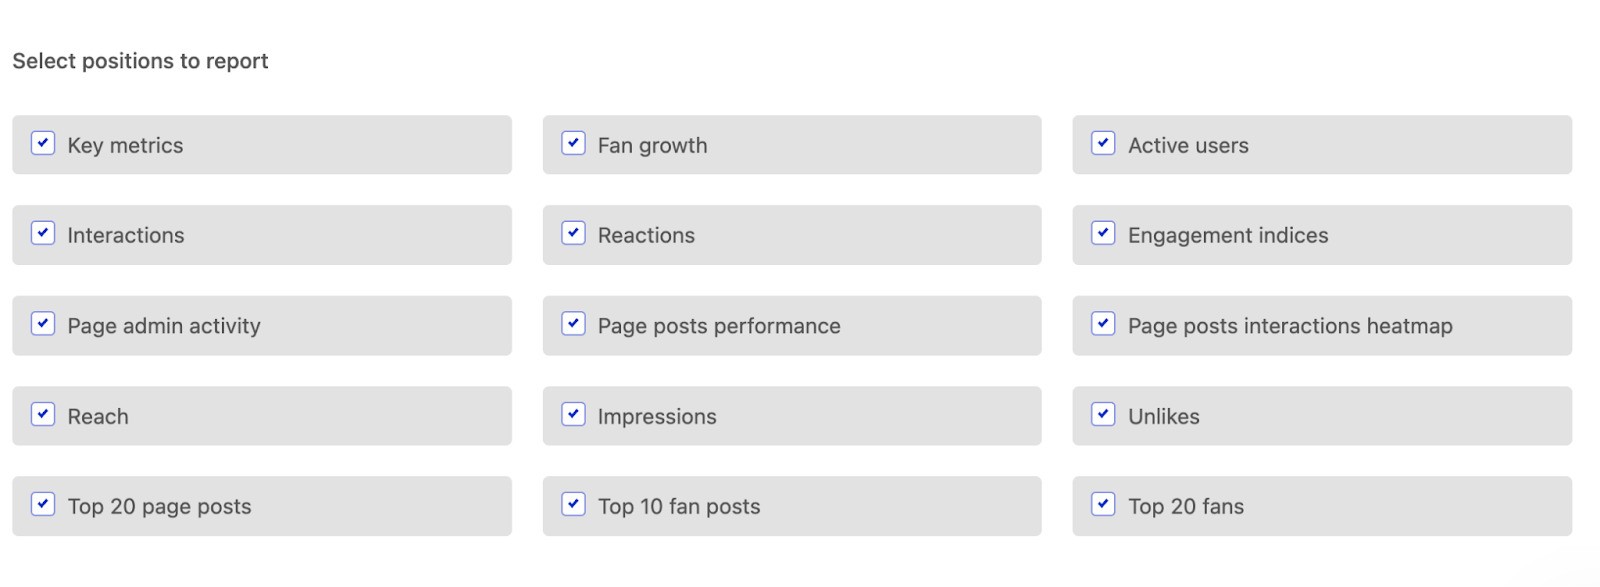
Go Analytics module, tap “Reports” in the upper right corner, and select the metrics you want to be included – and NapoleonCat will generate a report automatically for you, with graphs, charts, and even geographical maps of your followers’ locations around the world.
You can also schedule a weekly, monthly, or quarterly report for each of your Facebook pages, or multiple Facebook pages in one, to be sent to your client’s email address automatically. And you can create competitive reports to compare your results on Facebook with your competition.
Why choose NapoleonCat to manage your Facebook pages
If the list above doesn’t yet convince you, here’s a rundown of the benefits:
- You get all your Facebook pages in one place, without constant switching between profiles and worrying about posting under the wrong name (we’ve all been there…)
- You can neatly organize your multiple Facebook pages into workspaces for different clients and assign different teams working on the accounts.
- You don’t have to add and remove people as managers to your pages, or worry about getting locked out of your own Facebook page.
- You get multiple helpful tools with one subscription: moderation and auto-moderation, content publishing, analytics, and reports, all built with team collaboration in mind.
- You can manage multiple social media profiles in one place, making social media management much more… manageable.
- You can add your clients to your workspace, but you can also collaborate with people who don’t have a NapoleonCat account, like external contributors or people on specific client teams outside of your agency.
- All of it helps save hours every week while helping combat social media overwhelm and avoid errors that are all too frequent when things get too chaotic and there’s no process.
If that sounds compelling, you can try NapoleonCat completely for free for 14 days and see how much time you can save managing your multiple Facebook pages.

Manage multiple Facebook Pages from one place
Manage all your DMs, comments, and reviews from multiple pages in one place. Automate repetitive tasks, schedule posts, and get detailed analytics and reports – with an all-in-one social media tool.
FAQs – Manage multiple Facebook accounts
How can multiple people manage a Facebook page?
There are a couple of ways to do it:
- Add others as admins to your Facebook page. You can invite people to manage your Facebook page in your page settings. Facebook will also allow you to distinguish between different roles to manage access – so you have full or partial control of a page, for example, only to moderate comments, publish content, or manage ads.
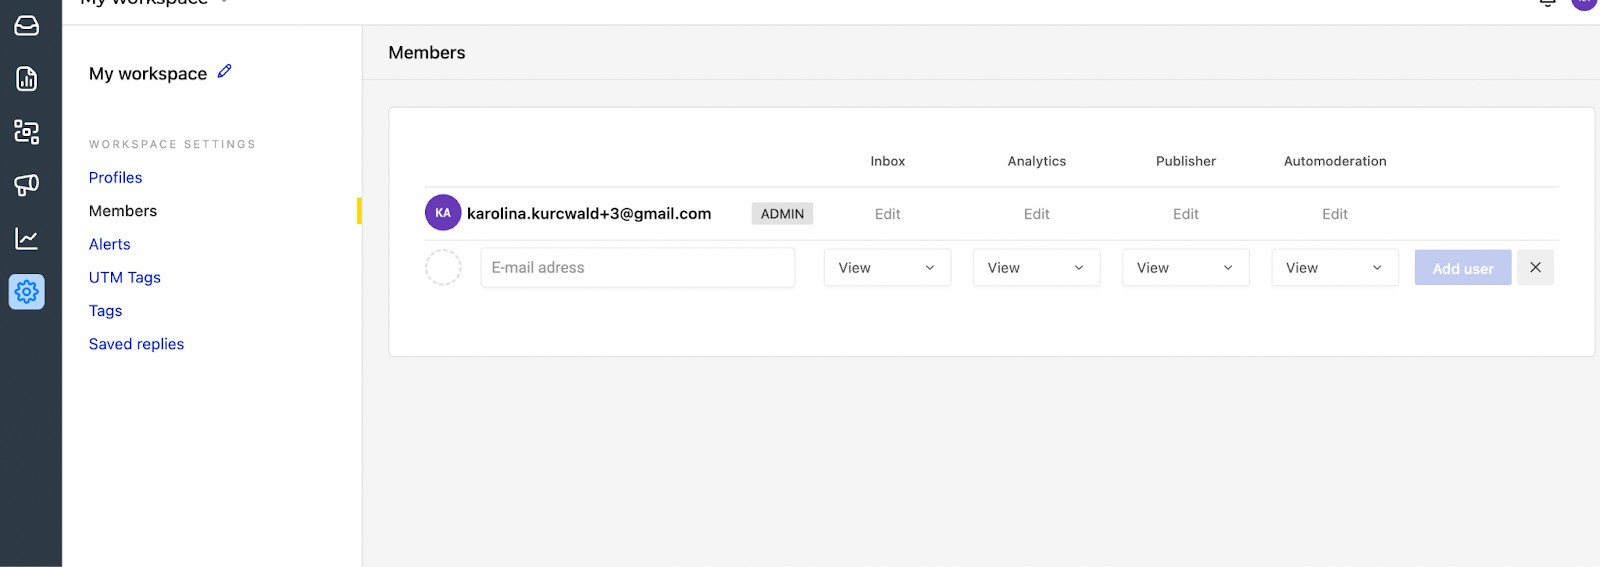
- Use an external tool like NapoleonCat. When you connect a Facebook page to the platform, you can assign access to it to multiple users without sharing direct access to the page on Facebook.
To add members, go to your Workspace settings, add an email address and specify the access level for different tools. This will let you assign different permissions for different purposes.
How do I let someone else manage my Facebook page?
You can grant full or partial access to a Facebook page in your page settings, specifying their role:
- Click your Page’s profile picture in the top right to go to your Page.
- Click Settings and privacy, then click Settings.
- Go to Page setup, then click View next to Page access.
- Next, go to People with Facebook access, click Add new.
- Click Next, type the name or email address of the person you want to give Facebook access, then click their name.
- From there, you can choose to give the person Facebook access with full control or partial control.
How do I add a second manager to my Facebook page?
Follow the same steps as described above to add admin access to your Facebook page.
How many people can have full control of a Facebook page?
There seems to be no limit to the number of Facebook page admins with full control. If you’re using NapoleonCat, you can add as many people as your plan permits you to.
How to manage multiple Facebook accounts?
To manage multiple Facebook Pages or accounts, use tools like Meta Business Suite or NapoleonCat. These platforms let you switch between Pages, schedule content, and monitor performance without logging in and out repeatedly. Meta Business Suite is Facebook’s native tool, while NapoleonCat offers additional features like automated moderation and team collaboration, making the workflow smoother and more efficient for social media managers.
How to manage multiple Facebook ad accounts?
You can manage multiple Facebook ad accounts in one place with NapoleonCat, making it easy to stay on top of comments, messages, and performance without switching between profiles:
- The Social Inbox collects all ad interactions across accounts, so you never miss a customer inquiry or lead.
- With Auto-moderation, you can also automatically hide/delete Facebook ad comments containing spam and hate speech.
Can a Facebook page be managed by two accounts?
Yes, a Facebook Page can be managed by two or more accounts. You simply need to assign roles (like Admin, Editor, or Moderator) to additional users via the Page settings. This allows team members to access the Page and perform different tasks based on their roles, improving collaboration and reducing the need to share login credentials.
What app can manage multiple Facebook pages?
Apps like NapoleonCat and Meta Business Suite are built to manage multiple Facebook Pages. NapoleonCat stands out for its intuitive dashboard, allowing you to schedule posts, reply to messages, and analyze performance metrics across several Pages at once. It also supports automated comment moderation and seamless team collaboration, which are essential for agencies and growing businesses.
How do I access my multiple Facebook accounts?
While Facebook doesn’t allow users to log into multiple personal accounts at once, you can manage several Facebook Pages from a single login using tools like Meta Business Suite or NapoleonCat. These platforms let you switch between Pages and manage them from a central dashboard, making it easier to keep things organized and efficient without constantly logging in and out.
You may also like:
- The Ultimate Facebook Analytics Tool to Analyze Your Performance
- How to Monitor Facebook Ads Comments From One View
- How to Handle Difficult Customers on Facebook
- How to Manage Multiple Instagram Accounts Like a Pro
- Top 10 Social Media Management Tools for Teams
- Top 11 Facebook Automation Tools
- How to Manage All Social Media in One Place – Facebook, Twitter, Instagram, and more
- How to Manage Multiple Social Media Accounts for Business
- How to Manage Multiple LinkedIn Accounts (without going mad)
- How to Turn Off Comments on Facebook Ads
- How to Get Paid for Reels on Facebook
- How to Turn off Comments on a Facebook Page
- The Complete Guide To Using Facebook Automated Responses
- Your 2025 Guide to Facebook Auto-moderation


