If you’re looking to attract and grow an audience, posting Facebook Reels is an effective way to do it. After all, 60.8% of people in the U.S. prefer Facebook over TikTok (yep, I’m as surprised as you!) if they want to get their short-video fix.
However, if you want to see positive results in your Facebook Reels campaign, you have to understand how successful brands do it. And you have to save Facebook Reels on a regular basis, so you have a treasure trove of ideas that can inspire your Reels strategy.
Chances are you, you’ve already saved a Facebook reel or two. The problem? You can’t find them anywhere.
But don’t let that stop you. In this guide, we’ll show you the simple steps to locate your saved Reels on Facebook. Once you’re done reading, you should be able to access your saved Facebook Reels with ease.
Simplify Social Media
Management with One Tool
- Manage & reply to comments and DMs in one place.
- Monitor ad comments from multiple accounts.
- Automate answers to repetitive questions.
- Schedule posts to multiple accounts, on desktop.
- Analyze performance and monitor hashtags.
- Keep track of your competition.
- Create or schedule in-depth reports in seconds.
Here’s how to find saved Reels on Facebook
You’ll be surprised how easy it is to locate your saved Reels on Facebook if you know where to look.
Here are the steps to find your saved Facebook Reels:
Step 1: Log in to Your Facebook Account
This part’s pretty straightforward. Let’s move along!
Step 2: Access Your Facebook Page’s Menu
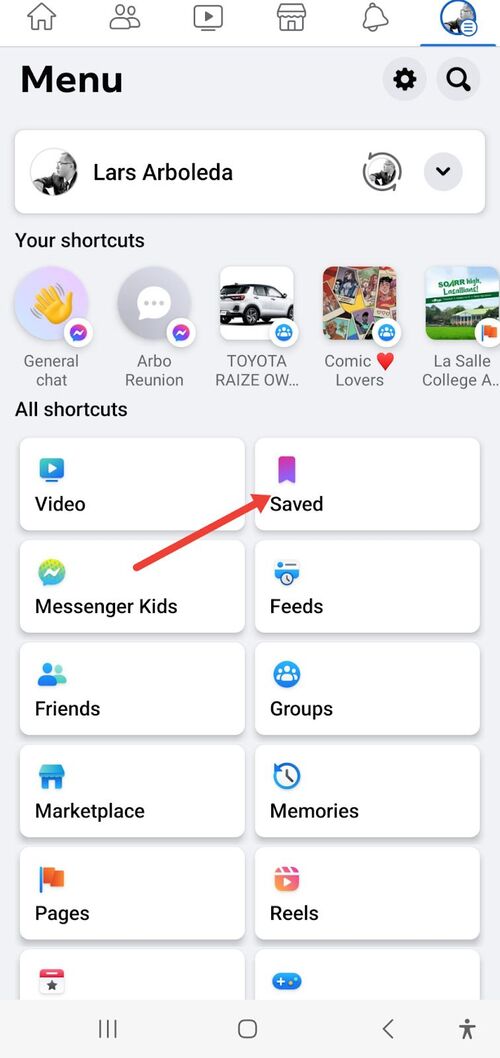
Once you’re logged in, head to the Facebook app’s home screen. Click on the picture icon of your Facebook Page (or Facebook profile) located in the top-right corner. This will take you to your Facebook Page’s menu.
Step 3: Navigate to the ‘Saved’ Section
On the Facebook Page menu, you’ll find an All shortcuts section. Along the options at the bottom, you’ll see the Saved option. Click on it to proceed.
Step 4: Find Your Saved Reels
Now that you’re on the Saved page, you should see all your saved content. This includes regular posts, videos, and, most importantly, your saved Reels.
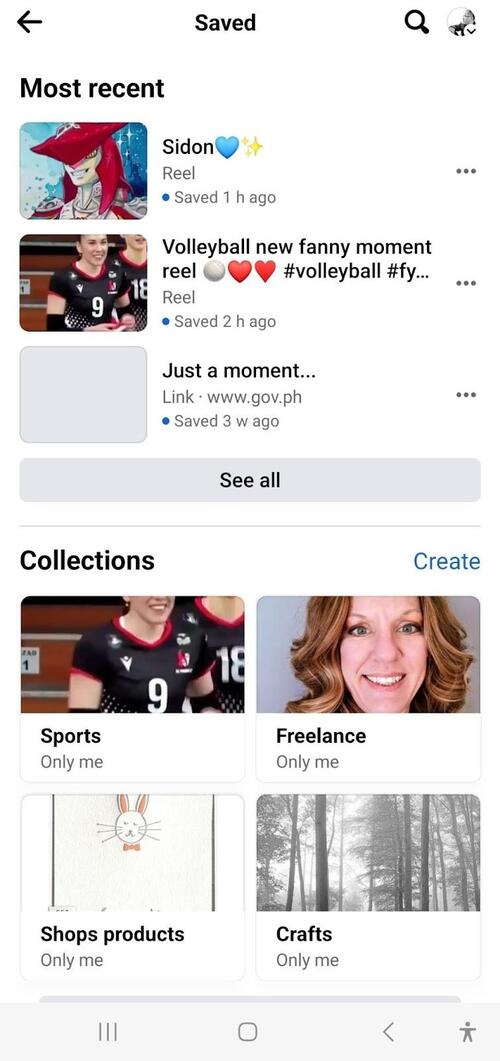
Scroll through the list, and you should be able to find the Reels you’ve saved!
Optional Step: Organize Your Saved Items with Themed Collections
If you’re an avid content curator and want to keep your saved items organized, Facebook allows you to create themed collections. This feature is not limited to Reels but can be used for organizing all your saved Facebook content.
To create a collection, simply tap on Create a Collection within the ‘Saved’ page. Name your collection based on the theme or category you have in mind, and start adding relevant content to it. This way, you can easily find and enjoy your favorite Reels or other content whenever you need them.
This feature is a fantastic way to revisit entertaining, inspiring, or educational content. What’s more, it can help you stay on top of your publishing schedule and Facebook content strategy.

Schedule unlimited Facebook Reels
Seamlessly schedule Facebook Reels to multiple pages at once. Collaborate and work in a team – with an all-in-one social media tool.
How to find saved Facebook reels on your computer
Looking for saved Facebook Reels is actually easier than finding them on a mobile device.
Follow these simple steps to locate your saved Reels on your desktop.
Step 1: Access your Facebook home page
You already know this part, so let’s get moving!
Step 2: Look to the left
Now, direct your attention to the left-hand side of the screen. See the long list of options from top to bottom? The Saved option should be in there.
Step 3: Click on the ‘Saved’ option
Give that ‘Saved’ option a good ol’ click.
Step 4: Dive into Your saved reels
You should now see all of your saved reels. Scroll through the list, and you should be able to revisit all the Facebook reels you’ve saved.
How to see liked Reels on Facebook
How about those Facebook Reels that earned your thumbs-up?
Here are the steps to find your liked Reels on Facebook:
Step 1: Go to your profile page
To begin, open the Facebook app and click on your name or profile photo at the top of the screen. This will take you to your personal profile page.
Step 2: Navigate to the Reels tab
Once you’re on your profile page, you should be able to find the Reels tab (scroll down a bit if you don’t see it). After clicking on Reels, you should see all the reels content associated with your account, including the ones you’ve saved (and yes, as you can see, this is another way to access your saved reels).
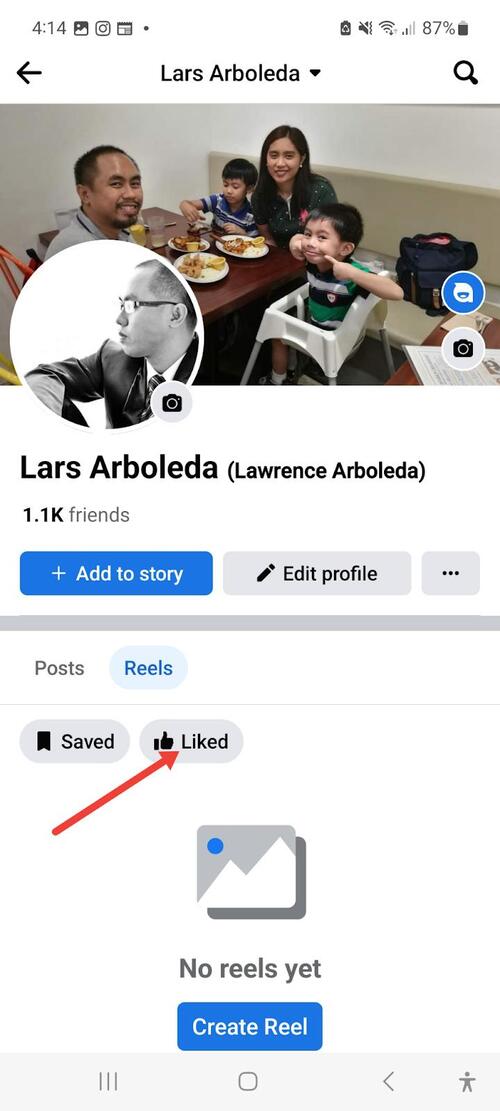
Step 3: Click on the Liked option
Under the Reels section, you’ll notice different options to view your Reels activity. Look for the Liked option and click on it. This action will show you a collection of all the Reels that you’ve given a thumbs-up to in the past.
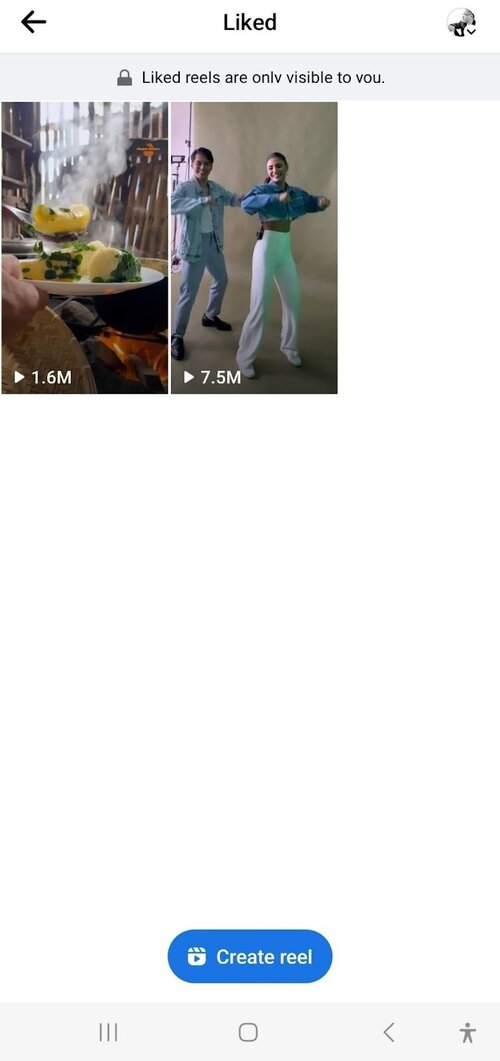
Step 4: Access your Liked reels
You’ve now reached the page displaying all the Reels you’ve liked on Facebook. From here, you can easily review and enjoy the Reels content you found interesting or inspiring.
Wrap up
Now that you know how to see your saved Reels, you can build a repository of short videos that can guide your Reels strategy and give you the ideas and inspiration you need to create Reels your audience will love.
Keep experimenting, stay creative, and enjoy the journey of engaging your followers with fantastic Facebook Reels!
Bonus content: How to schedule your Facebook Reels much easier
As you may have heard or noticed, scheduling Facebook Reels via the Meta Business Suite can get tedious – especially if you’re managing multiple brands across different social media platforms.
By using NapoleonCat’s Publishing tool, you can schedule and publish Facebook Reels using one convenient dashboard, eliminating the need to switch between multiple apps and tools. It can also save you a ton of time (and headache) in the process. You can also work in a team, assign tasks, and exchange internal feedback.
We highly recommend you test NapoleonCat completely for free here – no credit card required during signup 😉
Anyway, here’s how to schedule Facebook Reels using NapoleonCat’s Publishing tool:
Step 1: Go to the Publisher in the left-side vertical menu.
Step 2: Start creating a post by tapping on Create post.
Step 3: Upload your Reel
After adding your Facebook profile to the social media management tool, upload your Reel. You can also add a description.
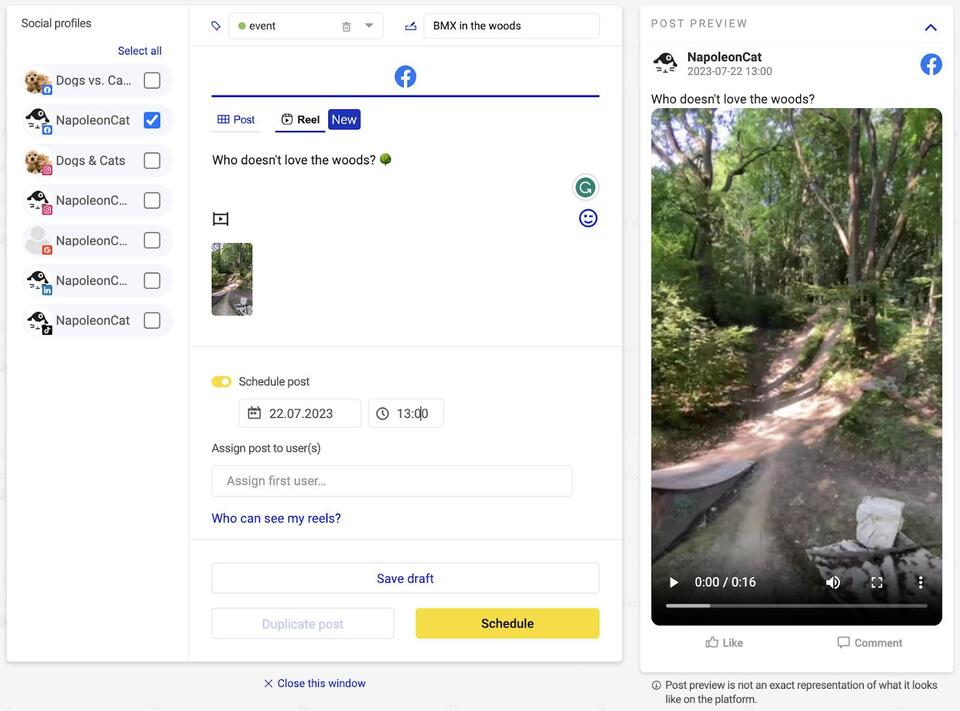
Now toggle on the Schedule post button and then select your preferred time and date for the Reel’s publication schedule.
If you wish to publish the Facebook Reel instantly, simply toggle off the Schedule post button and post away!
The best part about NapoleonCat’s Publishing tool is that you can use it to schedule and post Instagram Reels alongside those from Facebook.
Just add your Instagram page. Once you’re in the create post section, tick the box for Instagram on the left-hand side and schedule your Instagram content alongside your Facebook Reels.

Simplify Social Media
Management with One Tool
- Manage & reply to comments and DMs in one place.
- Monitor ad comments from multiple accounts.
- Automate answers to repetitive questions.
- Schedule posts to multiple accounts, on desktop.
- Analyze performance and monitor hashtags.
- Keep track of your competition.
- Create or schedule in-depth reports in seconds.
You may also like:
- A Quick Guide to Social Media Publishing
- The Best Times to Post on Social Media
- Here’s The Best Time to Post on TikTok
- Best Time to Post Reels on Instagram
- Best Times to Post on Instagram
- Best Time to Post on TikTok
- What’s The Best Time to Post on LinkedIn
- What’s a Social Media Scheduler, and Why Do You Need One?
- 10 Free and Paid Social Media Scheduling Tools for Teams
- How to Schedule Instagram Posts in Advance
- How to Schedule Reels on Facebook and Get Those Views
- How to Post Reels on Facebook – a Step-By-Step Guide
- How to Get Paid for Reels on Facebook

